
Introduction
Welcome to this comprehensive tutorial where we'll explore how to implement Lottie animations in your React Native projects. We'll walk through a detailed example that demonstrates how to replace static GIF files with dynamic, scalable animations.
What is Lottie?
Lottie is a powerful open-source animation tool that bridges the gap between designers and developers. It enables the creation of high-quality, scalable vector animations that can be seamlessly integrated across multiple platforms, including iOS, Android, and web applications. By using Lottie, developers can significantly enhance user experience through engaging animations.
You can find and download Lottie animation files from LottieFiles, a vast library of ready-to-use animations.
Let's dive into implementing Lottie animations in your React Native project!
Initialization
npx create-expo-app react-native-lottieNext, navigate to the project directory:
cd react-native-lottieInstalling Dependencies
To use Lottie Files in our project, we should install lottie-react-native package.
npx expo install lottie-react-nativeStarting the Emulator:
To start the emulator, run the command:
npx expo startThe emulator is up and running!
Implementation
For this example, we will implement a simple weather mobile application ui with using animated weather animation files. You can download it here. Thanks jochang for this animated files ❤️
Download the .json lottie files and copy it into /assets folder in your project!
import { StatusBar } from 'expo-status-bar';
import { StyleSheet, View } from 'react-native';
import { useRef, useEffect } from 'react';
import LottieView from 'lottie-react-native';
export default function App() {
const animation = useRef<LottieView>(null);
useEffect(() => {
// You can control the ref programmatically, rather than using autoPlay
// animation.current?.play();
}, []);
return (
<View style={styles.container}>
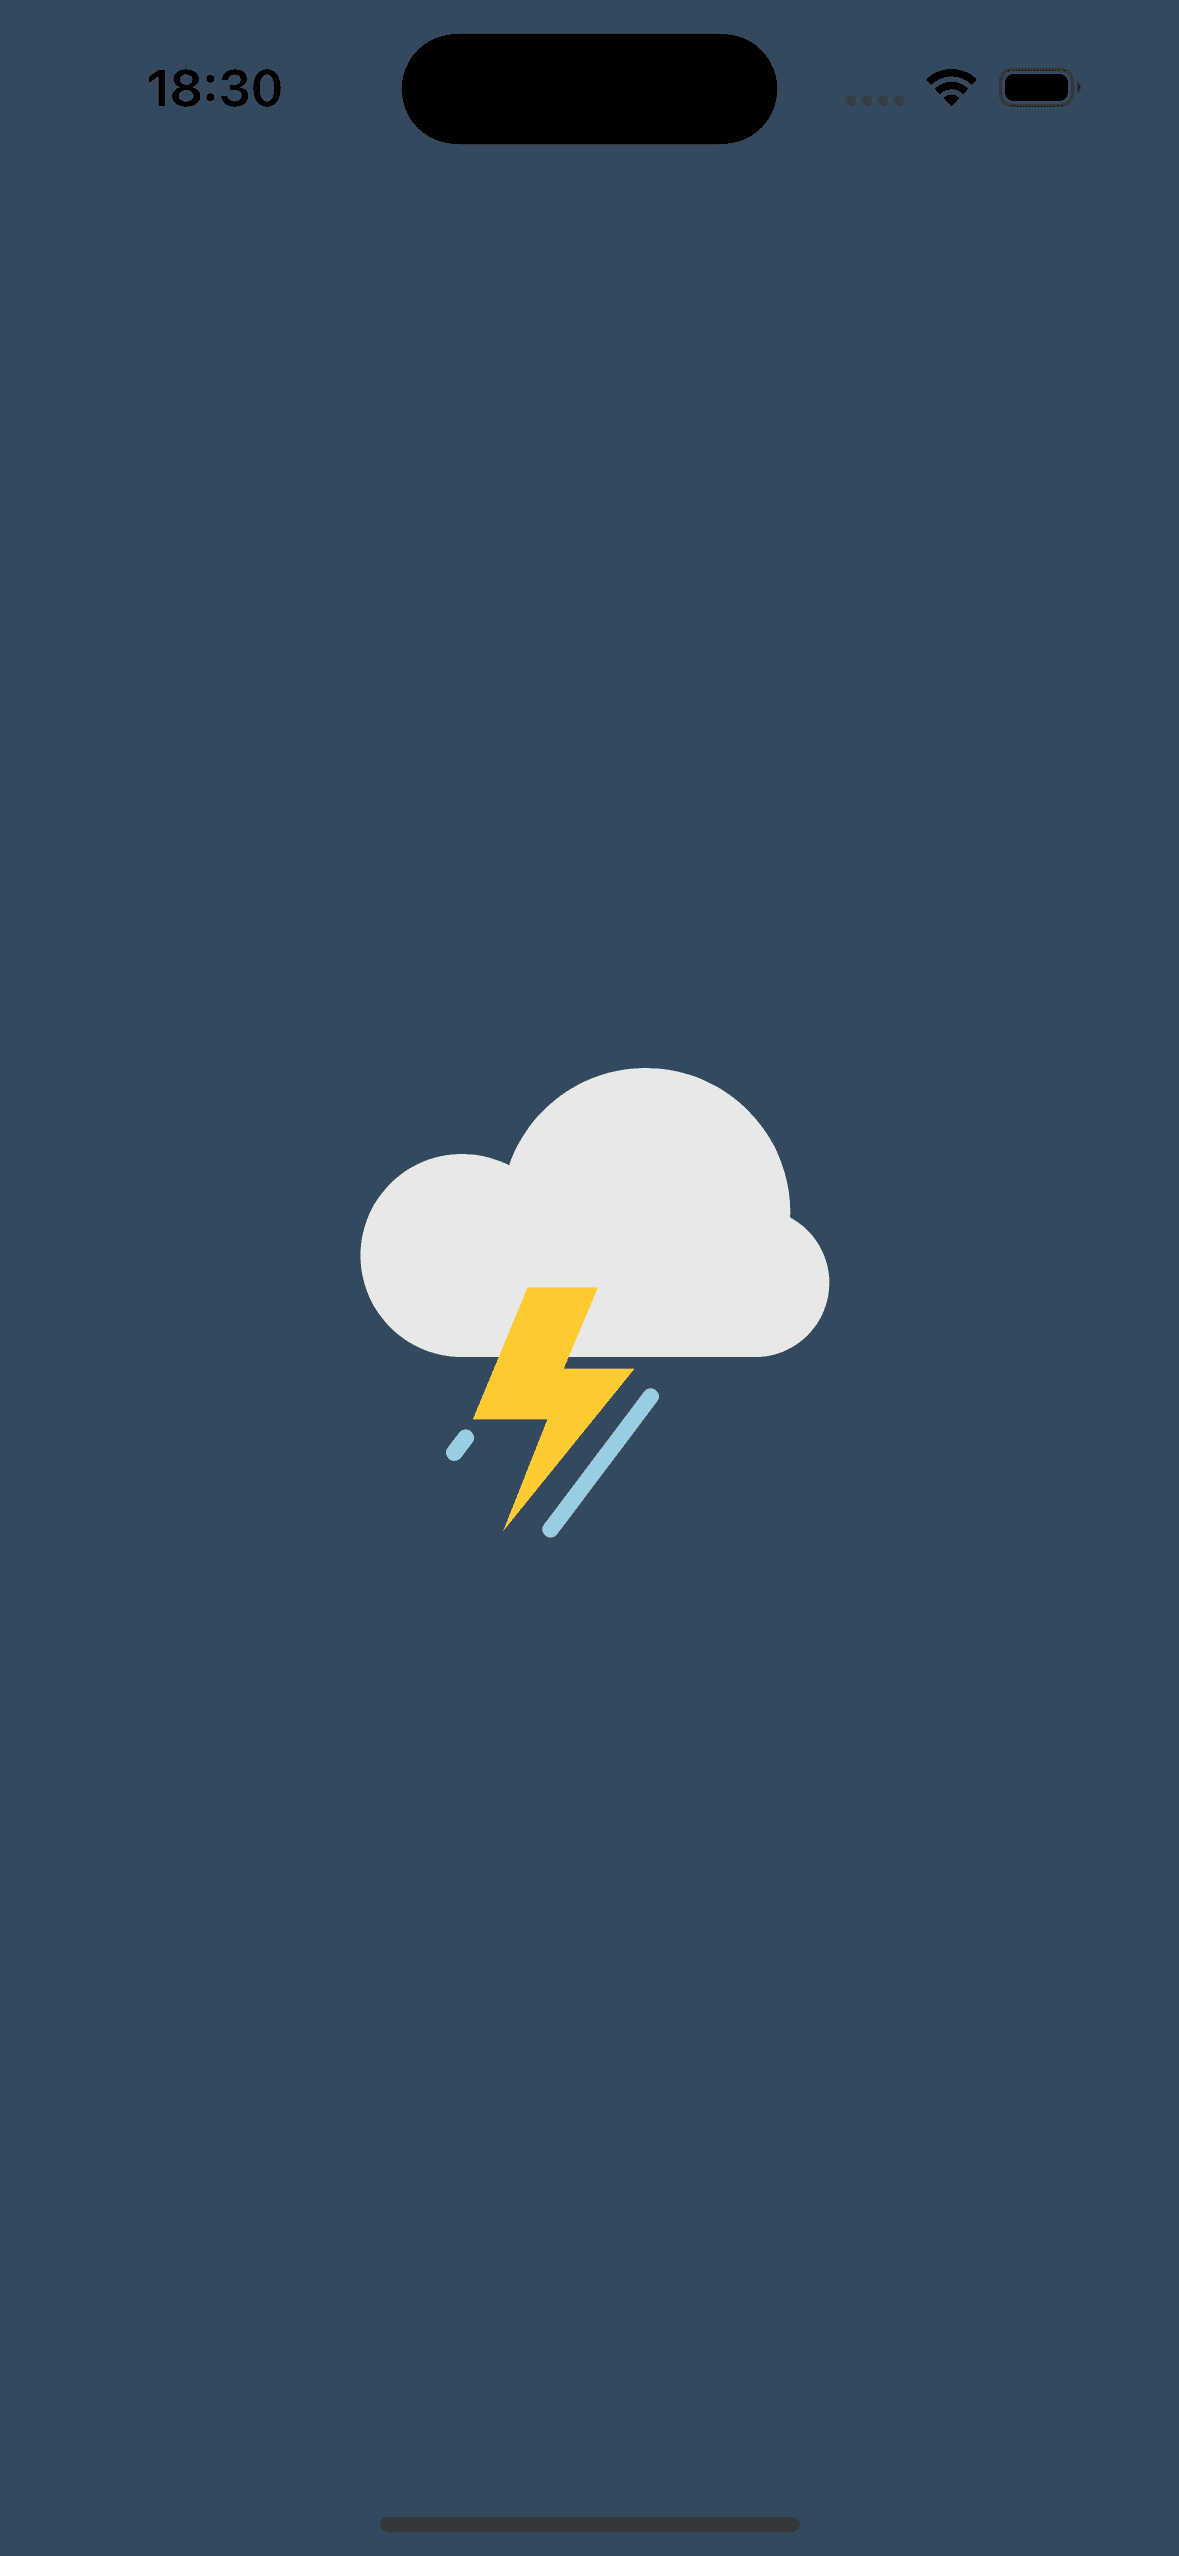
<LottieView
autoPlay
ref={animation}
style={{
width: 200,
height: 200,
}}
source={require('./assets/weather_1.json')}
/>
<StatusBar style='light' />
</View>
);
}
const styles = StyleSheet.create({
container: {
flex: 1,
backgroundColor: '#34495e',
alignItems: 'center',
justifyContent: 'center',
},
});
It is animating now!
You can control the animation with useRef
animation.current?.reset();
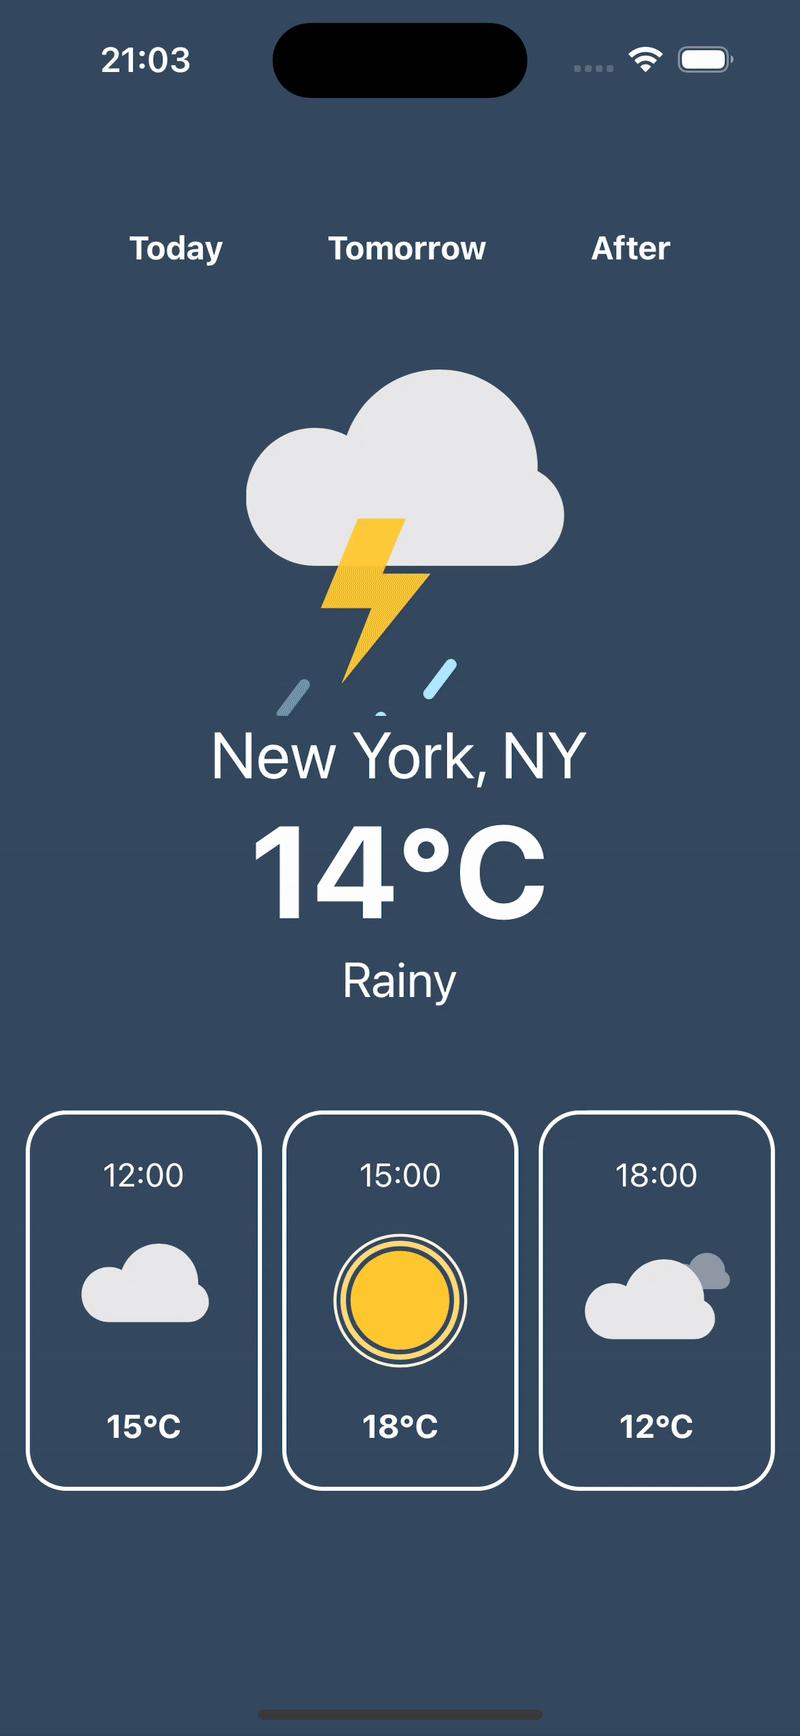
animation.current?.play();Lets add some ui magic and convert this to simple weather app iu with using lottie files.
import { StatusBar } from 'expo-status-bar';
import { View, Text } from 'react-native';
import { useRef, useEffect } from 'react';
import LottieView from 'lottie-react-native';

export default function App() {

  const data = [{
          temp: '15°C',
          time:'12:00',
          source: require('./assets/weather_2.json')
      },
      {
          temp: '18°C',
          time:'15:00',
          source: require('./assets/weather_3.json')
      },
      {
          temp: '12°C',
          time:'18:00',
          source: require('./assets/weather_4.json')
      }];

  const animation = useRef<LottieView>(null);
  useEffect(() => {
    // You can control the ref programmatically, rather than using autoPlay
    // animation.current?.play();
  }, []);

  return (
    <View style={{
        flex: 1,
        padding: 12,
        backgroundColor: '#34495e',
    }}>

        <View style={{
            marginTop: 100,
            flexDirection:'row',
            justifyContent:'space-evenly'
        }}>
            <Text style={{color:'#FFF', fontSize: 16, fontWeight: 'bold'}}>Today</Text>
            <Text style={{color:'#FFF', fontSize: 16, fontWeight: 'bold'}}>Tomorrow</Text>
            <Text style={{color:'#FFF', fontSize: 16, fontWeight: 'bold'}}>After</Text>

        </View>

        <View style={{
            marginTop: 20,
            alignItems:'center'
        }}>
            <LottieView
                autoPlay
                ref={animation}
                style={{
                    width: 200,
                    height: 200,

                }}
                source={require('./assets/weather_1.json')}
            />
            <Text style={{color:'#FFF', fontSize: 32, fontWeight: 'regular'}}>New York, NY</Text>
            <Text style={{color:'#FFF', fontSize: 64, fontWeight: 'bold'}}>14°C</Text>
            <Text style={{color:'#FFF', fontSize: 24, fontWeight: 'regular'}}>Rainy</Text>
        </View>

        <View style={{
            flexDirection:'row',
            marginTop: 50,
            gap: 10,
            alignSelf:'center'
        }}>
            {data.map((item:any, key:number)=>
                <View key={key.toString()} style={{
                    alignItems:'center',
                    borderColor:'#FFF',
                    borderWidth: 2,
                    borderRadius: 20,
                    paddingVertical: 20,
                    paddingHorizontal: 16
                }}>
                    <Text style={{color:'#FFF', fontSize: 16, fontWeight: 'regular'}}>{item.time}</Text>
                    <LottieView
                        autoPlay
                        ref={animation}
                        style={{
                            width: 80,
                            height: 80,
                            marginVertical: 12
                        }}
                        source={item.source}
                    />
                    <Text style={{color:'#FFF', fontSize: 16, fontWeight: 'bold'}}>{item.temp}</Text>

                </View>)}
        </View>


      <StatusBar style='light' />
    </View>
  );
}
Bonus
Let's made a another cool touch, the animation! 😍
We need to install Reanimated library to implement beautiful FadeIn animation!
npx expo install react-native-reanimatedBy utilizing the Reanimated library, we can create stunning FadeIn effects for each component!
import { StatusBar } from 'expo-status-bar';
import { View, Text } from 'react-native';
import { useRef, useEffect } from 'react';
import LottieView from 'lottie-react-native';
import Animated, { FadeInDown } from 'react-native-reanimated';

export default function App() {

  const data = [{
          temp: '15°C',
          time:'12:00',
          source: require('./assets/weather_2.json')
      },
      {
          temp: '18°C',
          time:'15:00',
          source: require('./assets/weather_3.json')
      },
      {
          temp: '12°C',
          time:'18:00',
          source: require('./assets/weather_4.json')
      }];

  const animation = useRef<LottieView>(null);
  useEffect(() => {
    // You can control the ref programmatically, rather than using autoPlay
    // animation.current?.play();
  }, []);

  return (
    <View style={{
        flex: 1,
        padding: 12,
        backgroundColor: '#34495e',
    }}>

        <Animated.View style={{
            marginTop: 100,
            flexDirection:'row',
            justifyContent:'space-evenly'
        }} entering={FadeInDown.delay(500).duration(1000)}>
            <Text style={{color:'#FFF', fontSize: 16, fontWeight: 'bold'}}>Today</Text>
            <Text style={{color:'#FFF', fontSize: 16, fontWeight: 'bold'}}>Tomorrow</Text>
            <Text style={{color:'#FFF', fontSize: 16, fontWeight: 'bold'}}>After</Text>
        </Animated.View>

        <Animated.View style={{
            marginTop: 20,
            alignItems:'center'
        }} entering={FadeInDown.delay(800).duration(1000)}>
            <LottieView
                autoPlay
                ref={animation}
                style={{
                    width: 200,
                    height: 200,

                }}
                source={require('./assets/weather_1.json')}
            />
            <Text style={{color:'#FFF', fontSize: 32, fontWeight: 'regular'}}>New York, NY</Text>
            <Text style={{color:'#FFF', fontSize: 64, fontWeight: 'bold'}}>14°C</Text>
            <Text style={{color:'#FFF', fontSize: 24, fontWeight: 'regular'}}>Rainy</Text>
        </Animated.View>

        <Animated.View style={{
            flexDirection:'row',
            marginTop: 50,
            gap: 10,
            alignSelf:'center'
        }} entering={FadeInDown.delay(1000).duration(1000)}>
            {data.map((item:any, key:number)=>
                <View key={key.toString()} style={{
                    alignItems:'center',
                    borderColor:'#FFF',
                    borderWidth: 2,
                    borderRadius: 20,
                    paddingVertical: 20,
                    paddingHorizontal: 16
                }}>
                    <Text style={{color:'#FFF', fontSize: 16, fontWeight: 'regular'}}>{item.time}</Text>
                    <LottieView
                        autoPlay
                        ref={animation}
                        style={{
                            width: 80,
                            height: 80,
                            marginVertical: 12
                        }}
                        source={item.source}
                    />
                    <Text style={{color:'#FFF', fontSize: 16, fontWeight: 'bold'}}>{item.temp}</Text>

                </View>)}
        </Animated.View>


      <StatusBar style='light' />
    </View>
  );
}
Final
Source Code
Github Repository LinkProject Dependencies
  "dependencies": {
    "expo": "~53.0.9",
    "expo-status-bar": "~2.2.3",
    "react": "19.0.0",
    "react-native": "0.79.2",
    "lottie-react-native": "7.2.2",
    "react-native-reanimated": "~3.17.4"
  },
  "devDependencies": {
    "@babel/core": "^7.25.2",
    "@types/react": "~19.0.10",
    "typescript": "~5.8.3"
  }
Conclusion
In this tutorial, we've explored how to implement Lottie animations in React Native applications. We've covered:
- Setting up a new React Native project with Lottie
- Installing and configuring necessary dependencies
- Creating a weather app UI with animated components
- Adding smooth transitions using React Native Reanimated
Lottie animations offer several advantages over traditional GIF files:
- Better performance and smaller file sizes
- Scalable vector graphics that maintain quality at any size
- Easy integration with React Native
- Rich animation capabilities with programmatic control
By following this guide, you can now create engaging, professional-looking animations in your React Native applications. The combination of Lottie and React Native Reanimated provides a powerful toolkit for creating smooth, interactive user interfaces.
Remember to check out the complete source code in our GitHub repository for reference and further experimentation. Happy animating!