
Introduction
Welcome to our comprehensive tutorial on making HTTP API calls in React Native. In mobile application development, communicating with external servers is essential for fetching data, submitting user information, and much more. Whether you need to retrieve weather forecasts, stock prices, or user profiles, mastering HTTP calls is crucial for creating dynamic, data-driven applications. In this guide, we'll explore how to implement API calls using Axios, a powerful HTTP client for JavaScript applications.
Creating Project
Let's start by setting up our React Native project using Expo CLI:
npx create-expo-app@latest --template blank-typescript react-native-axiosNavigate to the project directory:
cd react-native-axiosProject Setup
Installing Dependencies
We need to install several essential packages for our project:
npm install axiosStarting the Development Environment
Launch your development environment with:
npx expo startGreat! Your emulator is now up and running.
Before building our application, let's explore the fundamental Axios operations you'll need to know. 🚀
Core Operations with Axios in React Native
Axios is a popular promise-based HTTP client that works in both Node.js and browser environments. Since React Native is built on JavaScript, Axios integrates seamlessly with React Native applications. For comprehensive information about Axios, visit the official documentation.
Implementing Axios in your project is straightforward. After importing the library, you can use its methods for different HTTP operations: GET, POST, PUT, and DELETE.
GET Request with Axios
axios.get('/api/example')
    .then(function (response) {
        // When the request succeeds
        console.log(response);
    })
    .catch(function (error) {
        // When the request fails
        console.log(error);
    })
    .then(function () {
        // Always executed regardless of success or failure
    });
POST Request with Axios
axios.post('/api/example', {
        title: title,
        description: description,
    })
    .then(function (response) {
        // When the request succeeds
        console.log(response);
    })
    .catch(function (error) {
        // When the request fails
        console.log(error);
    });
PUT Request with Axios
axios.put('/api/example/1', {
        title: title,
        description: description,
    })
    .then(function (response) {
        // When the request succeeds
        console.log(response);
    })
    .catch(function (error) {
        // When the request fails
        console.log(error);
    });
DELETE Request with Axios
axios.delete('/api/example')
    .then(function (response) {
        // When the request succeeds
        console.log(response);
    })
    .catch(function (error) {
        // When the request fails
        console.log(error);
    });
Implementation
For this tutorial, we'll build a Rick and Morty Character Explorer mobile application. We'll use the Rick and Morty API to fetch character data.
Let's first implement the basic structure of the app, including the loading state. Since data fetching can take time, it's important to show users a loading indicator. We'll use React Native's ActivityIndicator component for this purpose:
import { StatusBar } from 'expo-status-bar';
import { View, Text, TouchableOpacity, FlatList, Image, ActivityIndicator} from 'react-native'
import axios from 'axios';
import React, { useEffect, useState } from 'react'


export default function App() {

  const API_URL = "https://rickandmortyapi.com/"

  const [loading, setLoading] = useState<boolean>(true);

  useEffect(() => {
    const fetchData = async () => {
    }
    fetchData();
  }, []);


  if (loading) {
      return(
          <View style={{flex:1, backgroundColor: '#121212', justifyContent:'center', alignItems:'center'}}>
            <ActivityIndicator color="#fff" size="large" />
          </View>
      )
  }

  return (
    <View style={{
      flex: 1,
      backgroundColor: '#121212',
      paddingTop: 50,
      paddingHorizontal: 10
    }}>
      <StatusBar style="light" />
    </View>
  );
}

In our application, there are several key components working together:
-
useEffect: This hook runs when the component mounts, making the initial API call to fetch the character list. Inside it, we define an asynchronous function that uses Axios to retrieve character data, then updates our state and disables the loading indicator. -
fetchCharacterDetails: This function is triggered when a user taps on a character. It accepts a character ID, sets a loading state, and makes a targeted API request for that specific character's details. Once the data is received, it updates the state and displays the modal. -
renderCharacterItem: This function handles the presentation of each character in our list view. It returns a touchable component showing the character's image, name, and status, with a color-coded indicator based on whether they're alive, dead, or unknown. -
renderCharacterModal: This function creates a detailed view modal that appears when a character is selected. It includes a loading state while fetching details, displays the character's complete information when loaded, and provides a close button for dismissing the modal.
These components work together to create a seamless user experience with proper loading states and error handling throughout the data fetching process.
import { StatusBar } from 'expo-status-bar';
import { View, Text, TouchableOpacity, FlatList, Image, ActivityIndicator, StyleSheet, SafeAreaView, Modal, ScrollView, Dimensions } from 'react-native';
import axios from 'axios';
import React, { useEffect, useState } from 'react';

/**
 * Character interface defines the structure of character data
 * from the Rick and Morty API
 */
interface Character {
  id: number;
  name: string;
  status: string;
  species: string;
  type: string;
  gender: string;
  image: string;
  episode: string[];
  created: string;
  location: {
    name: string;
    url: string;
  };
  origin: {
    name: string;
    url: string;
  };
}

/**
 * API response interface for the character listing endpoint
 */
interface ApiResponse {
  info: {
    count: number;
    pages: number;
    next: string | null;
    prev: string | null;
  };
  results: Character[];
}

export default function App() {
  // Base URL for the Rick and Morty API
  const API_URL = "https://rickandmortyapi.com/api/";

  // Application state management
  const [loading, setLoading] = useState<boolean>(true);                                  // Loading state for initial data fetch
  const [characters, setCharacters] = useState<Character[]>([]);                                    // Array of characters from API
  const [selectedCharacter, setSelectedCharacter] = useState<Character | null>(null);     // Currently selected character
  const [modalVisible, setModalVisible] = useState<boolean>(false);                       // Controls modal visibility
  const [detailLoading, setDetailLoading] = useState<boolean>(false);                     // Loading state for character details

  /**
   * useEffect hook to fetch the initial list of characters when the component mounts
   * This is called only once when the app starts
   */
  useEffect(() => {
    const fetchData = async () => {
      try {
        // Initial API call to get characters
        const response = await axios.get<ApiResponse>(`${API_URL}character`);

        // Update state with received characters
        setCharacters(response.data.results);
        setLoading(false);
      } catch (error) {
        console.error("Error fetching data:", error);
        setLoading(false);
      }
    };
    fetchData();
  }, []);

  /**
   * fetchCharacterDetails - Fetches detailed information about a specific character
   *
   * This function:
   * 1. Sets loading state for detail view
   * 2. Makes API request to get specific character data by ID
   * 3. Updates the selectedCharacter state with complete data
   * 4. Shows the modal with character details
   *
   * @param characterId - The ID of the character to fetch details for
   */
  const fetchCharacterDetails = async (characterId: number) => {
    setDetailLoading(true);
    try {
      // Make API request to get specific character details
      const response = await axios.get<Character>(`${API_URL}character/${characterId}`);

      // Update state with the detailed character data
      setSelectedCharacter(response.data);
      setModalVisible(true);
    } catch (error) {
      console.error("Error fetching character details:", error);
    } finally {
      setDetailLoading(false);
    }
  };

  /**
   * renderCharacterItem - Renders each character card in the FlatList
   *
   * This component:
   * 1. Displays character image
   * 2. Shows basic character info
   * 3. Handles tap interaction to open character details
   *
   * @param item - The character data to render
   */
  const renderCharacterItem = ({ item }: { item: Character }) => (
    <TouchableOpacity
      style={styles.characterCard}
      onPress={() => fetchCharacterDetails(item.id)}
    >
      <Image
        source={{ uri: item.image }}
        style={styles.characterImage}
      />
      <View style={styles.characterInfo}>
        <Text style={styles.characterName}>{item.name}</Text>
        <View style={styles.characterStatus}>
          <View style={[
            styles.statusDot,
            {
              backgroundColor:
                item.status === 'Alive' ? '#55CC44' :
                item.status === 'Dead' ? '#D63D2E' : '#9E9E9E'
            }
          ]} />
          <Text style={styles.characterStatusText}>{item.status} - {item.species}</Text>
        </View>
      </View>
    </TouchableOpacity>
  );

  /**
   * renderCharacterModal - Renders the modal with detailed character information
   *
   * This component:
   * 1. Shows a loading indicator while fetching character details
   * 2. Displays detailed character information once loaded
   * 3. Includes a close button to dismiss the modal
   *
   * The data shown includes:
   * - Character image
   * - Name, status, and species with visual status indicator
   * - Origin and current location
   * - Type (if available)
   * - Gender
   * - Creation date
   * - Number of episodes the character appears in
   */
  const renderCharacterModal = () => {
    if (!selectedCharacter) return null;

    return (
      <Modal
        animationType="slide"
        transparent={true}
        visible={modalVisible}
        onRequestClose={() => setModalVisible(false)}
      >
        <View style={styles.modalOverlay}>
          <View style={styles.modalContent}>
            {detailLoading ? (
              // Show loading indicator while fetching character details
              <View style={styles.modalLoading}>
                <ActivityIndicator color="#62CF9B" size="large" />
                <Text style={styles.modalLoadingText}>Loading character details...</Text>
              </View>
            ) : (
              // Display character details once loaded
              <ScrollView>
                <Image
                  source={{ uri: selectedCharacter.image }}
                  style={styles.modalImage}
                  resizeMode="cover"
                />
                <View style={styles.modalInfo}>
                  <Text style={styles.modalName}>{selectedCharacter.name}</Text>
                  <View style={styles.characterStatus}>
                    <View style={[
                      styles.statusDot,
                      {
                        backgroundColor:
                          selectedCharacter.status === 'Alive' ? '#55CC44' :
                          selectedCharacter.status === 'Dead' ? '#D63D2E' : '#9E9E9E'
                      }
                    ]} />
                    <Text style={styles.modalStatusText}>
                      {selectedCharacter.status} - {selectedCharacter.species}
                    </Text>
                  </View>

                  <View style={styles.modalDetailSection}>
                    <Text style={styles.modalDetailTitle}>Origin</Text>
                    <Text style={styles.modalDetailText}>{selectedCharacter.origin.name}</Text>
                  </View>

                  <View style={styles.modalDetailSection}>
                    <Text style={styles.modalDetailTitle}>Last known location</Text>
                    <Text style={styles.modalDetailText}>{selectedCharacter.location.name}</Text>
                  </View>

                  {selectedCharacter.type ? (
                    <View style={styles.modalDetailSection}>
                      <Text style={styles.modalDetailTitle}>Type</Text>
                      <Text style={styles.modalDetailText}>{selectedCharacter.type}</Text>
                    </View>
                  ) : null}

                  <View style={styles.modalDetailSection}>
                    <Text style={styles.modalDetailTitle}>Gender</Text>
                    <Text style={styles.modalDetailText}>{selectedCharacter.gender}</Text>
                  </View>

                  <View style={styles.modalDetailSection}>
                    <Text style={styles.modalDetailTitle}>Created</Text>
                    <Text style={styles.modalDetailText}>
                      {new Date(selectedCharacter.created).toLocaleDateString()}
                    </Text>
                  </View>

                  <View style={styles.modalDetailSection}>
                    <Text style={styles.modalDetailTitle}>Appears in</Text>
                    <Text style={styles.modalDetailText}>
                      {selectedCharacter.episode.length} episodes
                    </Text>
                  </View>
                </View>
              </ScrollView>
            )}

            <TouchableOpacity
              style={styles.closeButton}
              onPress={() => setModalVisible(false)}
            >
              <Text style={styles.closeButtonText}>Close</Text>
            </TouchableOpacity>
          </View>
        </View>
      </Modal>
    );
  };

  /**
   * Loading state view - shown when initially loading the character list
   */
  if (loading && characters.length === 0) {
    return (
      <View style={styles.loadingContainer}>
        <ActivityIndicator color="#fff" size="large" />
      </View>
    );
  }

  /**
   * Main application view
   * - Displays the header with app title
   * - Shows the list of characters using FlatList
   * - Renders the character detail modal when a character is selected
   */
  return (
    <SafeAreaView style={styles.container}>
      <StatusBar style="light" />
      <View style={styles.header}>
        <Text style={styles.headerTitle}>Rick and Morty</Text>
        <Text style={styles.headerSubtitle}>Character Explorer</Text>
      </View>
      <FlatList
        data={characters}
        keyExtractor={(item) => item.id.toString()}
        renderItem={renderCharacterItem}
        contentContainerStyle={styles.listContainer}
      />
      {renderCharacterModal()}
    </SafeAreaView>
  );
}

/**
 * Styles for the application
 * Using a dark theme with green accent colors to match Rick and Morty's aesthetic
 */
const styles = StyleSheet.create({
  container: {
    flex: 1,
    backgroundColor: '#121212',
  },
  loadingContainer: {
    flex: 1,
    backgroundColor: '#121212',
    justifyContent: 'center',
    alignItems: 'center',
  },
  header: {
    paddingTop: 15,
    paddingBottom: 15,
    paddingHorizontal: 16,
    backgroundColor: '#1E1E1E',
  },
  headerTitle: {
    fontSize: 28,
    fontWeight: 'bold',
    color: '#62CF9B',
    textAlign: 'center',
  },
  headerSubtitle: {
    fontSize: 16,
    color: '#A7A7A7',
    textAlign: 'center',
    marginTop: 4,
  },
  listContainer: {
    padding: 12,
  },
  characterCard: {
    backgroundColor: '#1E1E1E',
    borderRadius: 12,
    marginBottom: 16,
    overflow: 'hidden',
    flexDirection: 'row',
    shadowColor: "#000",
    shadowOffset: {
      width: 0,
      height: 2,
    },
    shadowOpacity: 0.25,
    shadowRadius: 3.84,
    elevation: 5,
  },
  characterImage: {
    width: 140,
    height: 140,
  },
  characterInfo: {
    flex: 1,
    padding: 12,
  },
  characterName: {
    fontSize: 18,
    fontWeight: 'bold',
    color: '#FFFFFF',
    marginBottom: 6,
  },
  characterStatus: {
    flexDirection: 'row',
    alignItems: 'center',
    marginBottom: 10,
  },
  statusDot: {
    width: 9,
    height: 9,
    borderRadius: 4.5,
    marginRight: 6,
  },
  characterStatusText: {
    color: '#CCCCCC',
    fontSize: 14,
  },
  infoLabel: {
    color: '#888888',
    fontSize: 12,
    marginTop: 5,
  },
  infoText: {
    color: '#FFFFFF',
    fontSize: 14,
  },
  footerLoader: {
    marginVertical: 16,
  },
  modalOverlay: {
    flex: 1,
    backgroundColor: 'rgba(0, 0, 0, 0.7)',
    justifyContent: 'center',
    alignItems: 'center',
  },
  modalContent: {
    width: Dimensions.get('window').width * 0.9,
    maxHeight: Dimensions.get('window').height * 0.8,
    backgroundColor: '#1E1E1E',
    borderRadius: 16,
    overflow: 'hidden',
  },
  modalImage: {
    width: '100%',
    height: 200,
  },
  modalInfo: {
    padding: 20,
  },
  modalName: {
    fontSize: 24,
    fontWeight: 'bold',
    color: '#FFFFFF',
    marginBottom: 8,
  },
  modalStatusText: {
    color: '#FFFFFF',
    fontSize: 16,
  },
  modalDetailSection: {
    marginTop: 16,
  },
  modalDetailTitle: {
    fontSize: 14,
    color: '#62CF9B',
    fontWeight: '600',
    marginBottom: 4,
  },
  modalDetailText: {
    fontSize: 18,
    color: '#FFFFFF',
  },
  closeButton: {
    backgroundColor: '#62CF9B',
    padding: 15,
    alignItems: 'center',
    marginTop: 10,
  },
  closeButtonText: {
    color: '#000000',
    fontSize: 16,
    fontWeight: 'bold',
  },
  modalLoading: {
    padding: 40,
    alignItems: 'center',
    justifyContent: 'center',
  },
  modalLoadingText: {
    color: '#FFFFFF',
    marginTop: 10,
    fontSize: 16,
  },
});

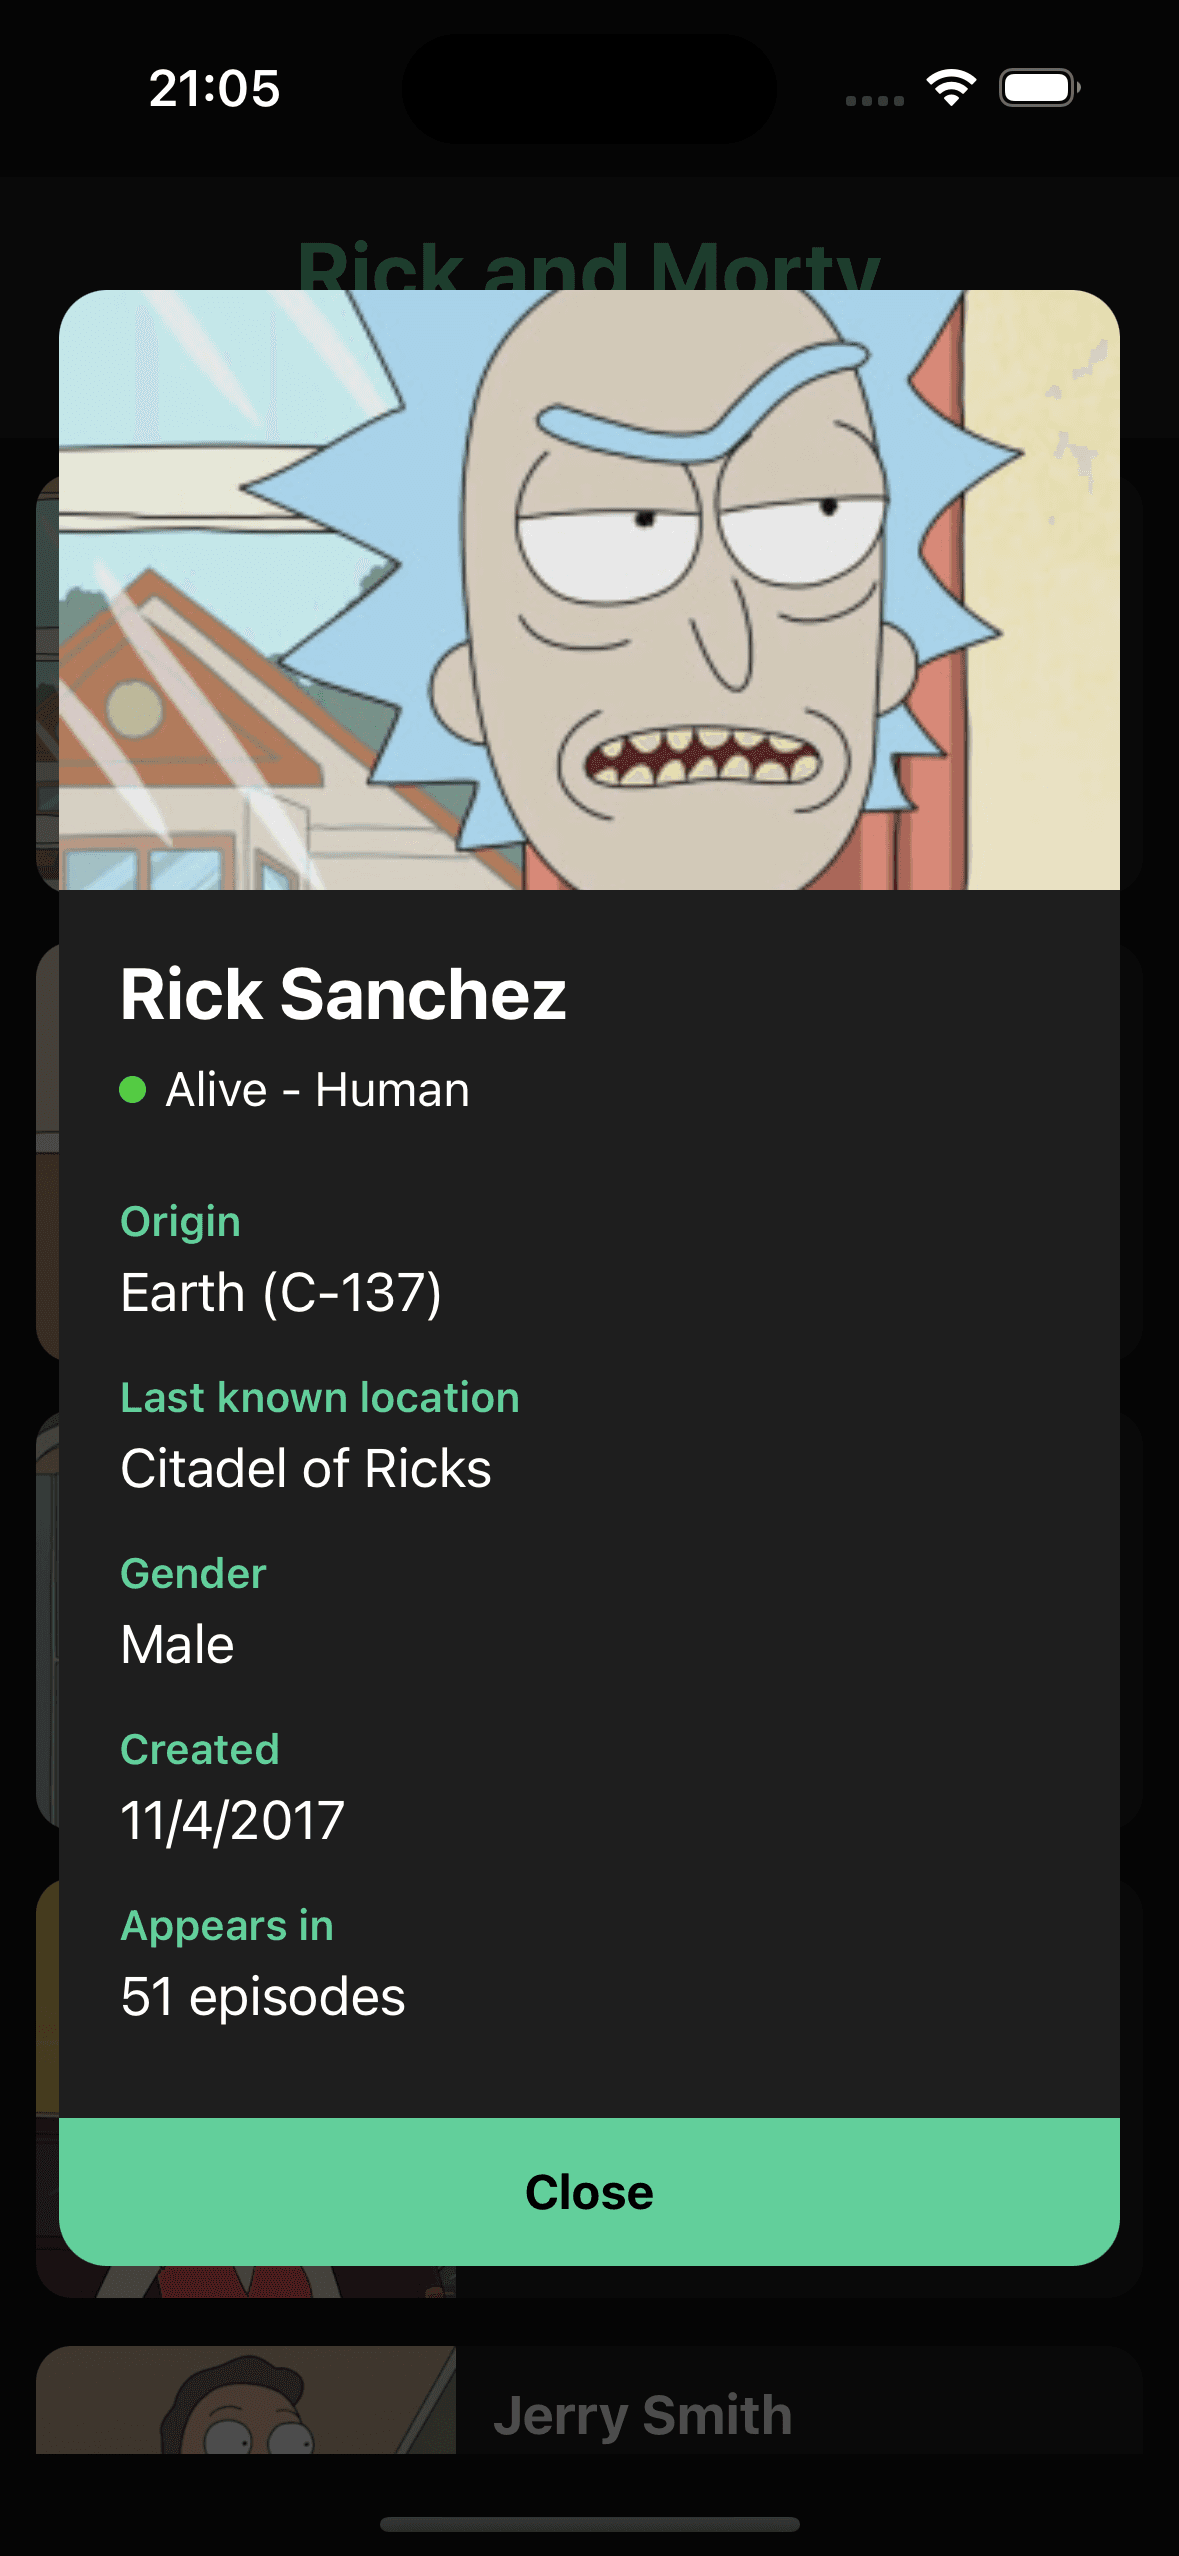
Our application now successfully fetches and displays character data from the Rick and Morty API. When a user selects a character from the list, we make a second API call to retrieve the detailed information and display it in a modal.
Source Code
For the complete project files, visit our GitHub Repository.
Project Dependencies
  "dependencies": {
    "axios": "^1.9.0",
    "expo": "~53.0.9",
    "expo-status-bar": "~2.2.3",
    "react": "19.0.0",
    "react-native": "0.79.2",
    "react-native-reanimated": "~3.17.4"
  },
  "devDependencies": {
    "@babel/core": "^7.25.2",
    "@types/react": "~19.0.10",
    "typescript": "~5.8.3"
  },
Conclusion
In this tutorial, we've successfully implemented HTTP API calls in a React Native application using Axios. We've covered:
- Setting up a React Native project with Expo
- Installing and configuring Axios
- Making GET requests to fetch data from an external API
- Handling loading states for better user experience
- Displaying the fetched data in a visually appealing UI
- Implementing modals for detailed views with additional API calls
Axios provides a clean, promise-based approach to making HTTP requests in React Native applications. Its intuitive API and robust error handling make it an excellent choice for connecting your mobile apps to external data sources.
For your next steps, consider implementing pagination to load more characters, adding search functionality, or exploring other API endpoints to enhance the application further. You might also want to implement caching strategies to improve performance and reduce unnecessary network requests.
Remember that proper error handling and loading states are crucial for providing a smooth user experience, especially when dealing with network operations that might fail or take time to complete.
By mastering Axios and HTTP communication in React Native, you've added a valuable skill to your mobile development toolkit that will serve you well in building data-driven applications.